Expanding an LVM Across Disks
March 15, 2018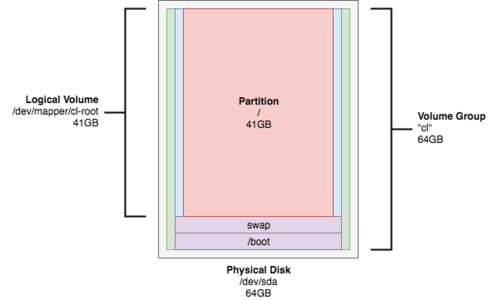
Did you know that you could expand your current logical volume across disks? It’s simple and easy!
Overview
If you require more disk space and must rely on another HDD or vHDD, you can expand the LVM across multiple disks and simulate one large virtual volume. For this lab, we have an instance of CentOS 7 with a 64GB HDD. We’ll be adding a second drive to the LVM and expanding the root partition.
Initial Look
Let’s take a look at our current disk usage. The root partition is 41GB and is 100% used.
[root@VM ~]# df -h
Filesystem           Size  Used Avail Use% Mounted on
/dev/mapper/cl-root   41G   41G   38M 100% /
Before we begin, we’ll confirm that this system is using LVM by running a pvscan.
[root@VM ~]# pvscan
PV /dev/sda2   VG cl              lvm2 [63.00 GiB / 4.00 MiB free]
Total: 1 [63.00 GiB] / in use: 1 [63.00 GiB] / in no VG: 0 [0   ]
Note: This can also be done with fdisk (among other tools).
[root@VM ~]# fdisk -l

Disk /dev/sda: 68.7 GB, 68719476736 bytes, 134217728 sectors
Units = sectors of 1 * 512 = 512 bytes
Sector size (logical/physical): 512 bytes / 4096 bytes
I/O size (minimum/optimal): 4096 bytes / 4096 bytes
Disk label type: dos
Disk identifier: 0x000a2075

   Device Boot      Start         End      Blocks   Id  System
/dev/sda1   *        2048     2099199     1048576   83  Linux
/dev/sda2         2099200   134217727    66059264   8e  Linux LVM
...
Expanding the LVM
Creating a New Physical Volume
After adding a physical HDD to the machine or a vHDD to the virtual machine, run an fdisk -l and see what device the new disk is.
[root@VM ~]# fdisk -l
...
Device Boot      Start         End      Blocks   Id  System
/dev/sda1   *        2048     2099199     1048576   83  Linux
/dev/sda2         2099200   134217727    66059264   8e  Linux LVM

Disk /dev/sdb: 68.7 GB, 68719476736 bytes, 134217728 sectors
...
As you can see, the new disk is listed as /dev/sdb. Let’s create a new physical volume on this new disk.
[root@VM ~]# pvcreate /dev/sdb
Physical volume "/dev/sdb" successfully created.
Just to confirm that you now have two physical volumes (two separate LVMs), you can run:
[root@VM ~]# pvs
PV         VG Fmt  Attr PSize  PFree
/dev/sda2  cl lvm2 a--  63.00g  4.00m
/dev/sdb      lvm2 ---  64.00g 64.00g
Expanding the Original Volume Group
Now that we have our new physical volume, let’s expand our original volume group (see the previous command for the volume group’s name).
[root@VM ~]# vgextend cl /dev/sdb
Volume group "cl" successfully extended
Let’s confirm that our existing volume group now reports an extra 64GB of space than originally assigned.
[root@VM ~]# vgs
VG #PV #LV #SN Attr   VSize   VFree
cl   2   3   0 wz--n- 126.99g 64.00g
Expanding the Logical Volume
Now that our volume group is taking up both disks, we can expand the logical volume (where our root partition that is out of space is located).
[root@VM ~]# lvextend -l +100%FREE /dev/mapper/cl-root
Size of logical volume cl/root changed from 40.98 GiB (10492 extents) to 104.98 GiB (26876 extents).
Logical volume cl/root successfully resized.
Expanding the / Partition
With the logical volume for root expanded and taking up the remainder of free space in our volume group, we can expand the root partition.
[root@VM ~]# xfs_growfs /dev/mapper/cl-root
meta-data=/dev/mapper/cl-root    isize=512    agcount=4, agsize=2685952 blks
         =                       sectsz=4096  attr=2, projid32bit=1
         =                       crc=1        finobt=0 spinodes=0
data     =                       bsize=4096   blocks=10743808, imaxpct=25
         =                       sunit=0      swidth=0 blks
naming   =version 2              bsize=4096   ascii-ci=0 ftype=1
log      =internal               bsize=4096   blocks=5246, version=2
         =                       sectsz=4096  sunit=1 blks, lazy-count=1
realtime =none                   extsz=4096   blocks=0, rtextents=0
data blocks changed from 10743808 to 27521024
Checking Our Work
If you run another df -h, you should see that the root partition has an extra 64GB of disk space. You have successfully grown your volume group, expanded your root logical volume, and expanded your root partition – all across two disks!
[root@VM ~]# df -h
Filesystem           Size  Used Avail Use% Mounted on
/dev/mapper/cl-root 105G 41G 65G 39% /LVM